Mosaic Support
Articles
Mosaic Support Videos
Processing Payments with Mosaic
Showing Payment Link Indicators in Grids
Sending a Single Payment Link for Multiple Payments
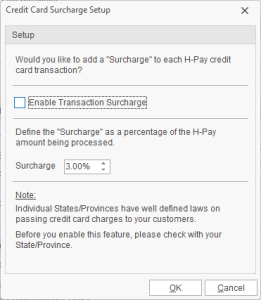
Including a Payment Surcharge on Card Payments
Inserting a Payment Link into an Email Template
Selecting Specific Deposits for Payment Links
Inserting Merge Fields into the Payment Link Email
Viewing an Indicator of Payment Links Paid Today
Refunding a Payment to a Credit Card
Sending and Processing Payment Links
Customizing the Payment Window
Automatically Updating Event Status When Posting Payments
Showing Automatic Notifications When Payment Links are Paid
Processing a Payment with a Tokenized Credit Card
Including Payments or Deposits Due on Event Prints
Using the Dynamic "Reply To" Email for Payment Links
Reviewing Payment Failures in an Event or Order
Posting Multiple Payments for a Client
Tracking Payment Transactions with Mosaic
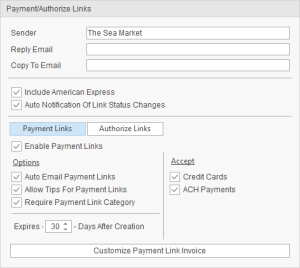
Setting Default Payment Link Expirations
Mosaic Guidebook
Setting Up Mosaic Payment Processing
Signing Up for Mosaic

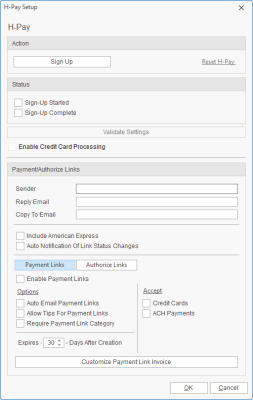

Enabling Payment/Authorization Links
Customizing the Payment Authorize Link Email
-
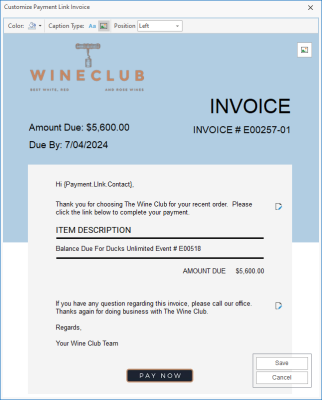
Title/Company Information
Click the Edit Title button at the top right of the window to edit the Title/Company Information text area (top left) of the email. This area allows for a maximum of 100 characters of text, and does not allow for line breaks (hard returns).
-
Logo
Click the Logo button along the top of the window and then click the matching button at the top right to choose an image to act as the logo for your email.
-
Clicking the Text Button
Click the Text button at the top of the window to switch this section back from an image to text.
-
Edit Notes
Click the Edit Notes button at the top right to edit the notes section.
Enabling Payment Surcharges
Storing Credit Cards for Contact People
- Retrieve a contact person in Contact Manager (see Finding a Contact in Contact Manager).
- Click the Stored Credit Cards button
 on the right side of the Contact Manager window.
Result: The Credit Cards On File window appears.
on the right side of the Contact Manager window.
Result: The Credit Cards On File window appears. - Click the Add Credit Card button
 at the top left of the window.
Result: The Mosaic credit card window appears.
at the top left of the window.
Result: The Mosaic credit card window appears.
Processing a Payment with Mosaic
- Pull up a record in either Event Manager, Quick Order Manager or Guestrooms Manager.
- Click the Payments Made button
 in the tool bar along the right side of the manager screen.
Result: The Payments window for that record appears.
in the tool bar along the right side of the manager screen.
Result: The Payments window for that record appears. - Click the Add Payment button at the right side of the Payments window.
Result: The Payment Details window appears.
- Enter payment details as desired.
- Click Process Credit Card at the top right of the Payment Details window and click Yes when prompted to save changes. Result: The Process Credit Card Transaction window appears.
-
Choose one of the following options:
-
If using the existing contact person and an existing card, confirm that information in the window and click OK to process the payment.
-
If using a different contact person with an existing card, click the Select From Contacts button
 on the right side of the window and choose the desired contact and then click OK to process the payment.
 -
If using an existing contact person and new card information, confirm that contact is selected as discussed in the bullet points above, uncheck the Use Available Credit Card check box at the bottom left of the window, click OK and move on to Step 7, below.
-
If using a new contact person with new card information, uncheck the Use Existing Contact check box, enter the new person’s details, click OK and move on to Step 7, below.
-
-
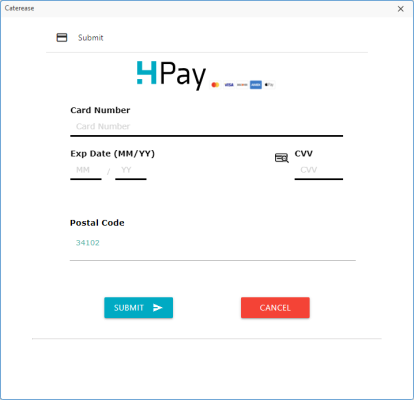
If choosing the third or forth option above, enter the card information for the payment in the Mosaic window that appears and click Submit.
Note: If entering new card information for an existing contact, you will be prompted to save that card on file for the future.
Adjusting a Tip for an Event or Quick Order
Adding or Adjusting a Tip
- Pull up a record in either Event Manager or Quick Order Manager.
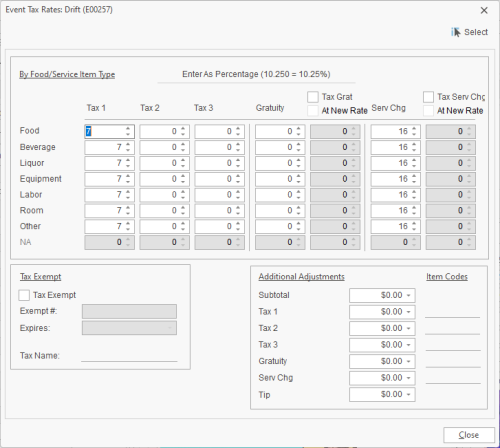
- Click the Tax Rates button
 in the tool bar along the right side of the manager screen.
Result: The Payments window for that record appears.
in the tool bar along the right side of the manager screen.
Result: The Payments window for that record appears. - Click the Add Payment button at the right side of the Payments window.
Result: The Tax Rates window appears.
Displaying the Tip Field in Event Manager
- In the window that pops up, click the check box next to the Tip field. Result: The Tip field is now displayed in the Financial area of the manager screen.
- Close the Set Financial Display window.
- With the Tip field in position, click the Save Window Settings button
 at the top right of the window to save this updated display as the new default for you or all users on your network.
Creating and Sending Payment Links
- Pull up a record in either Event Manager, Quick Order Manager or Guestrooms Manager.
- Click the Link button
 in the tool bar along the right side of the manager screen and choose New Payment Link.
Result: The New Payment Link window appears.
in the tool bar along the right side of the manager screen and choose New Payment Link.
Result: The New Payment Link window appears.
Note: If the Link button is not available in the tool bar, see Customizing the Tools Menu and Tools Bar.
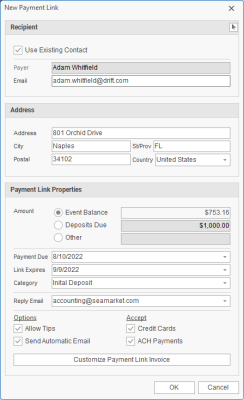
- Confirm recipient information (defaults to main contact for the event/order/booking) in the New Payment Link window or click the Select Contact button
 at the top right of the window to choose a different contact.
Note: You can also add a custom contact for this one link by unchecking the Use Existing Contact option and typing new information. This new contact will not be added to the program and will be for this one payment only.
at the top right of the window to choose a different contact.
Note: You can also add a custom contact for this one link by unchecking the Use Existing Contact option and typing new information. This new contact will not be added to the program and will be for this one payment only. - Confirm the amount for the payment by choosing to bill for the balance due, any past due deposits (events or group room contracts only) or some other amount.
Note: The Deposits Due option will not be available if there are no schedule deposits with dates past due (see Scheduling Future Event Deposits). Deposit amount will default to total of all deposits past due; click the Select from Deposit List button to choose a specific deposit.
- Confirm or edit the payment due date and link expiration date. Note: The expiration date of a link can be edited after that link has been sent.
- Confirm the Reply To email address for this link or select a different one. Note: This field defaults to the address you have established in your Mosaic Setup; other options here include the email address of the sales rep for this party or order or the administrator of this Caterease program.
- At the bottom of the window, optionally change the following default choices:
- Allow Tips With this box checked, your customers will be able to add tips to payments for events or quick orders. Note: Guestroom payment links do not allow for tips.
- Send Automatic Email Check this box to have the program automatically send the payment link invoice as soon as you click OK below. With this box unchecked, a link will be created which you would then send through a custom Caterease email template. (See Creating E-mail Templates for more information.)
- Credit Cards Check this box to allow customers to use a credit card to pay this invoice.
- ACH Payments Check this box to allow customers to pay this invoice by ACH electronic check.
- Customize Payment Link Invoice Click this button to edit the contents of the payment link invoice email for this one link. Note: Payment link invoice emails default to the contents you established in setting up the Mosaic interface. For more information, see Setting Up Mosaic Payment Processing.
- Click OK at the bottom of the window to send the payment link email to the recipient email address indicated in Step 3, above. Note: If you have unchecked the Send Automatic Email option (above), the window will close and a link will be created – but no email will be automatically sent by the program.
Creating and Sending Authorization Links
- Pull up a record in either Event Manager, Quick Order Manager or Guestrooms Manager.
- Click the Link button in the tool bar along the right side of the manager screen and choose New Authorize Link.
Result: The Authorize Credit Card Link window appears.
Note: If the Link button is not available in the tool bar, see Customizing the Tools Menu and Tools Bar.
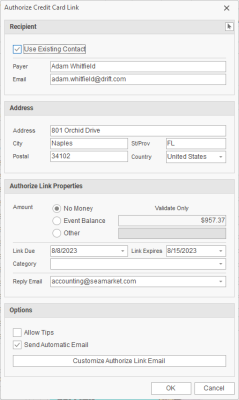
- Confirm recipient information (defaults to main contact for the event/order/booking) in the Authorize Credit Card Link window or click the Select Contact button at the top right of the window to choose a different contact.
Note: You can also add a custom contact for this one link by unchecking the Use Existing Contact option and typing new information. This new contact will not be added to the program and will be for this one payment only. - Confirm the amount to be authorized, or enter/choose a different amount.
Note: Authorize links default to “No Money”, meaning the customer will simply be placing a card on file for the event, order or group booking. - Confirm or edit the link due date and link expiration date.
Note: The expiration date of a link can be edited after that link has been sent. - Confirm the Reply To email address for this link or select a different one.
Note: This field defaults to the address you have established in your Mosaic Setup; other options here include the email address of the sales rep for this party or order or the administrator of this Caterease program. - At the bottom of the window, optionally change the following default choices:
- Allow Tips
With this box checked, your customers will be able to add tips to authorized cards for events or quick orders.
Note: Guestroom links do not allow for tips. - Send Automatic Email
Check this box to have the program automatically send the authorize link email as soon as you click OK below. With this box unchecked, a link will be created which you would then send through a custom Caterease email template. (See Creating E-mail Templates for more information.) - Customize Authorize Link Invoice
Click this button to edit the contents of the payment link invoice email for this one link.
Note: Payment link invoice emails default to the contents you established in setting up the Mosaic interface. For more information, see Setting Up Mosaic Payment Processing.
- Allow Tips
- Click OK at the bottom of the window to send the authorize link email to the recipient email address indicated in Step 3, above.
Note: If you have unchecked the Send Automatic Email option (above), the window will close and a link will be created – but no email will be automatically sent by the program.
Processing Links from Customers
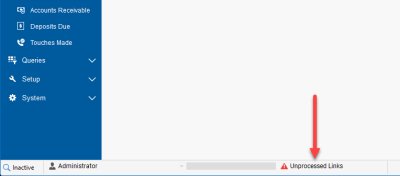
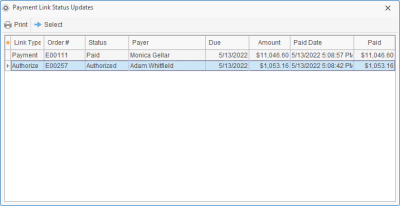
- Optionally print the list by clicking the Print button at the top left of the window, or double click any record (or choose a record and click Select at the top left of the window) to retrieve that record in the appropriate manager.
Note: Once this results window is closed, you can reopen it here in Payment Link Manager by clicking the Tools button on the right side of the window and choosing View Last Update Results. (Note that this always shows the results of the most recent update performed.)
Manually Authorizing an Existing or New Card
- In a query results grid or in the grid that appears long the left side of a manager screen, show the Authorized Credit Card column.
Note: To display the Authorized Credit Card column, click the Quick Column Customizing button
 at the top left of the grid (see Working with Grids.) If the column has a black icon
  , there is a card on file has been validated but has no payment amount; a yellow icon
  indicates that a card has already been authorized for a certain amount and a green icon
  indicates that an authorized payment has already been processed.
 - Double-click in the Authorized Credit Card column next to any record.
Result: the Credit Cards on File window opens.
Note: As an alternative, you can click the Authorized Credit Cards button
 in the tool bar along the right side of the Event Manager, Quick Order Manager or Guestrooms Manager screen. If the Authorized Credit Cards button is not available in the tool bar, see Customizing the Tools Menu and Tools Bar.
at the top left of the window.
Result: The Authorize Credit Card window opens. 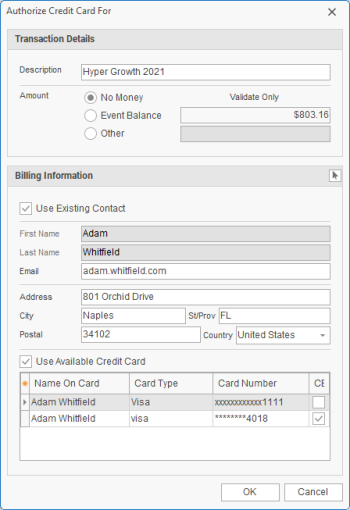
At the top of the window, enter the amount to be authorized or choose “No Money” to simply validate a card for future payment.
Note: If authorizing a specific amount, that amount will remain on hold for up to 7 days until you process the payment.Choose one of the following options:
If using the existing contact person and an existing card, confirm that information in the window and click OK to authorize the card.
If using a different contact person with an existing card, click the Select From Contacts button
on the right side of the window and choose the desired contact and then click OK to authorize the card.If using an existing contact person and new card information, confirm that contact is selected as discussed in the bullet points above, uncheck the Use Available Credit Card check box at the bottom left of the window, click OK and move on to Step 6, below.
If using a new contact person with new card information, uncheck the Use Existing Contact check box, enter the new person’s details, click OK and move on to Step 6, below.
If choosing the third or forth option above, enter the card information for the payment in the Mosaic window that appears and click Submit.
Posting a Payment with a Validated Card
- Pull up a record in either Event Manager, Quick Order Manager or Guestrooms Manager.
- Click the Payments Made button in the tool bar along the right side of the manager screen.
Result: The Payments window for that record appears.
- Click the Add Payment button at the right side of the Payments window.
Result: The Payment Details window appears.
- Enter payment details as desired.
- Click Process Credit Card at the top right of the Payment Details window and click Yes when prompted to save changes. Result: The Process Credit Card Transaction window appears.
- At the bottom of the window, select the validated credit card you wish to use for payment.
Note: Validated cards have a black check mark icon to the left of them; cards on file for a customer have a small person icon
 next to them.
 - Click OK to process the payment using the selected card.
Processing Authorized Payments
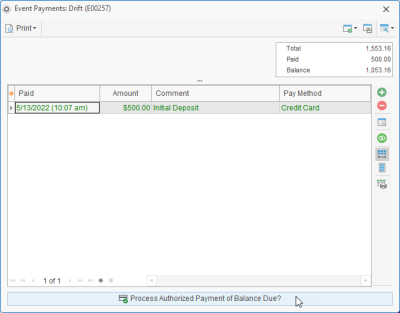
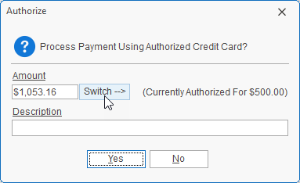
Processing a Payment for Balance Due on an Authorized Card
- Pull up a record in either Event Manager, Quick Order Manager or Guestrooms Manager.
- Click the Payments Made button in the tool bar at the right side of the window.
Result: The Event Payments window opens.
Processing an Authorized Amount on a Card
- Pull up a record in either Event Manager, Quick Order Manager or Guestrooms Manager.
- Access the Credit Cards on File window in one of the following ways:
- Click the Authorized Credit Cards button in the tool bar along the right side of the manager screen.
Note: If the Authorized Credit Cards button is not available in the tool bar, see Customizing the Tools Menu and Tools Bar. As an option, you can display the
- Double-click the yellow icon in the Authorized Credit Card column of the manager’s grid.
Note: To display the Authorized Credit Card column, click the Quick Column Customizing button at the top left of the grid (see Working with Grids.) If the icon is black , the card on file has not been authorized for a specific amount; if there is no icon, no card has been authorized for that record.
- Click the Authorized Credit Cards button

Processing Multiple Payments in Batch
- Select all records for which you wish to process payment.
Note: A green icon
in the Authorized Credit Cards column indicates that the authorized payment has already been processed; black means the card is merely “Validated” (with no payment amount assigned) and yellow means the card has been authorized for a specific payment. This process will only use this last two groups with the black or yellow symbol. - Right click the group and choose Card Authorization > Process Balance Due Payment.
Result: A confirmation message appears.
Note: If you have selected records that do not have active “Validated” or “Authorized” cards – ones where the payment has already been processed (green icon in the Authorized Credit Cards column) or where there is no card on file (empty Authorized Credit Cards column) – you will be notified that those records have been unselected.
- Click Yes to process these cards for the full balances due of the corresponding events.
Note: Batch payments are processed for the entire current balance due regardless of the authorized amount on the card.
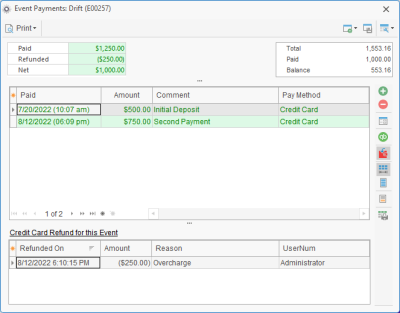
Refunding a Payment with Mosaic
Any payment processed through our powerful Mosaic integration – whether done manually or via payment link – can be easily refunded.
- Pull up a record in either Event Manager, Quick Order Manager or Guestrooms Manager.
- Click the Payments Made button in the tool bar along the right side of the manager screen.
Result: The Payments window for that record appears.
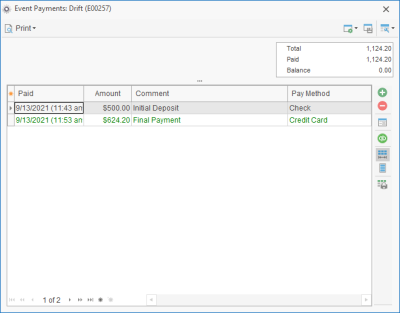
- Select the specific payment to be refunded.
Note: Successfully processed payments appear in green font on the Payments window, and are the only payments that can be refunded through Mosaic. - Click the View/Edit Payment Details button
 on the right side of the window.
Result: The Payment Details window appears for the selected payment. - Click the Credit Card tab on the left side of the Payment Details window.
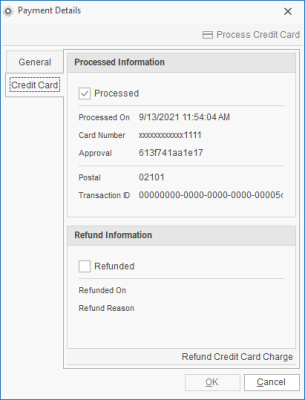
- Click Refund Credit Card Charge at the bottom right of the Payment Details window and click Yes to confirm your choice.
Result: The Refund window appears. - Enter an amount for the refund (partial refunds are acceptable) and reason for the refund (“Mistake”, “Overcharge”, etc.) and click OK.
Result: The refund is processed and a confirmation message appears.
Note: Refund “reasons” is a customizable quickpick list under your control (see Customizing Quickpick Lists). - Click OK to close the confirmation window and Cancel to close the Payment Details window
- [Optional] To see a list of all refunds for this event listed at the bottom of this Event Payments window, click the Show Credit Card Refunds button
 at the center-right of the window.
Note: The total amount paid, total refunds and net remaining payment amount will be listed at the top left of the Payments Window as soon as any refunds are processed.
Using the Mosaic Transaction Error Log
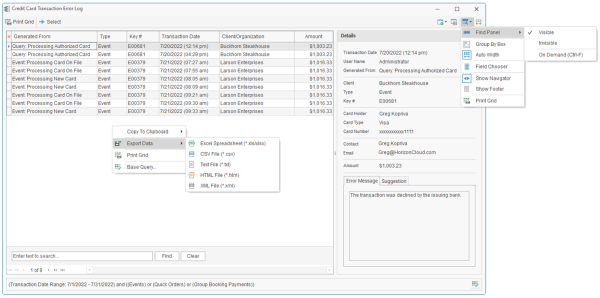
 in the bottom right corner of the error log window and choose Base Query to adjust the initial parameters (date range, etc.) you established in Steps 2 & 3, above.
 Viewing and Editing Links in a Manager
- Pull up a record in either Event Manager, Quick Order Manager or Guestrooms Manager.
- Click the Link button in the tool bar along the right side of the manager screen and choose View Existing Links.
Result: The Payment Links window appears.
Note: If the View Payment Links button is not available in the tool bar, see Customizing the Tools Menu and Tools Bar.
- [Optional] Select an active payment link in the window and click the Tools button along the right side of the window and choose one of the following options:
- Cancel Payment Link Makes the outstanding payment link immediately invalid.
- Extend Payment Link Provides the option to extend the expiration date of the payment link.
- Resend Payment Link Resends the payment link to its original recipient with its original due date and expiration date.
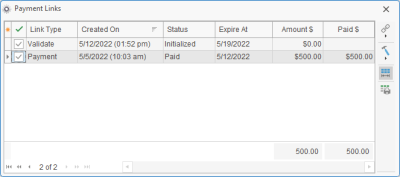
Managing Links in the Payment Link Manager

Optionally adjust the date range or excluded link statuses on the Payment Link Manager Base Query screen and then click OK.
Result: The Payment Link Manager opens listing all links for the date range and status criteria you established in your Base Query, above.
Note: You can edit the existing base query inside the Payment Link Manager by clicking the Base Query button at the bottom right of the manager window and choosing Base Query.
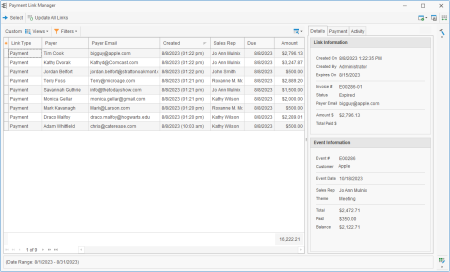
- [Optional] Customize the columns appearing in the manager grid or sort and filter grid data as described in Working with Grids.
- [Optional] Select any link record in the grid and then click any of the three tabs along the right side of the manager to review the following information:
- Details Shows general details of the selected link and its associated event.
- Payment Breaks down the specific payment details of the select link – including the link amount, any optional tip, an associated surcharge amount and the total payment.
- Activity Lists all activity for the selected link from the date/time it was created until the date/time it was paid or expired.
- [Optional] Select one or several records in the grid, click the Tools button at the right of the screen and choose one of the following options:
- Cancel Payment Link Makes the selected payment link(s) immediately invalid.
- Extend Payment Link Provides the option to extend the expiration date of the selected payment link(s).
- Resend Payment Link Resends the selected payment link(s) to its/their original recipient with its original due date and expiration date.
- Update All Links Checks for any updates in payment status of ALL links (regardless of whether or not any are currently selected). This tool is also available as a button at the top left of the Payment Links Manager window.
- Update Selected Links Checks for updates in payment status for only the selected link or links.
- View Last Update Results Opens a window listing the most recently updated link records.
- Mark Link(s) As > Sent or Unsent Marks all selected links as either Sent or Unsent. (Useful if links are emailed manually as opposed to using automatic templates.)
Tracking Mosaic Payment Transactions
Tracking Payment Links with the Activity Query


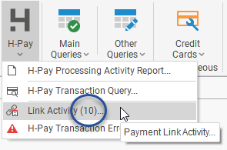
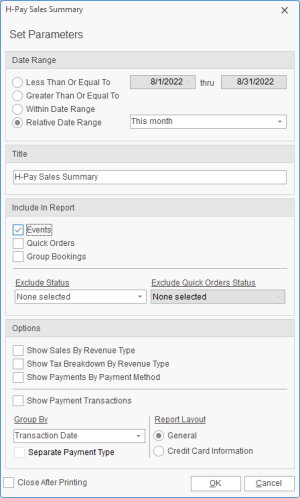
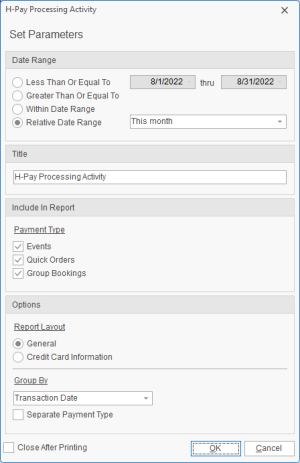
Generating the Mosaic Processing Activity Report
Generating the Mosaic Sales Summary Report